Showing posts with label Tutorials. Show all posts

How to - Remove Sweat or Shine Spots In Photoshop

09:22 Add Comment


Hot spots are shiny/sweaty areas on a subject’s face which are caused by a flash reflecting off a shiny surface or by uneven lighting. It tends to make the subject look as if they are sweating, which is not a good look. There are nearly always more that one way to fix problems like this in Photoshop but here I’ll show you how to do it using the clone tool and some blending modes.
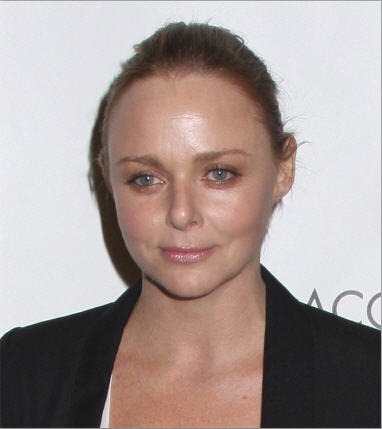
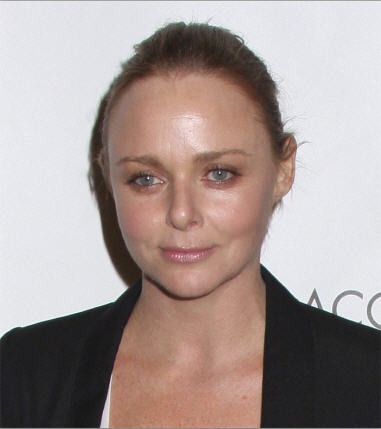
1. Open up the photograph with the shiny hot spots that you want to fix. I’m using a picture of Stella McCartney that looks like it was taken in a red carpet situation and she’s looking a little shiny on the forehead and nose.
Portrait
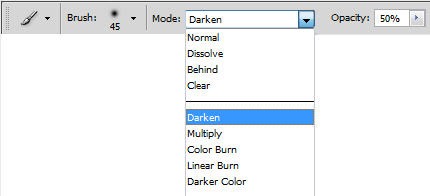
2. Select the Clone Stamp Tool (S) from the toolbox. In the Options Bar at the top of the screen, choose a large, soft-edged brush and set the Mode to Darken and lower the Opacity to about 50%.
Options
The idea behind setting the mode to Darken is that the only pixels that will change are the ones that are lighter than our sample area. The hot spots are essentially light colored pixels.
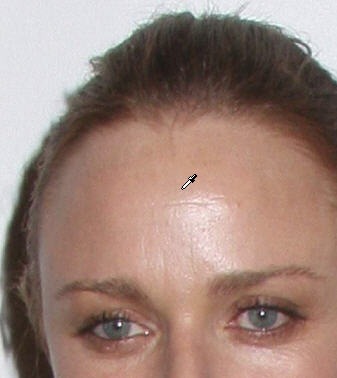
3. On your subject’s face, choose an area of “clean” or non-hot spot skin. This will be the reference point and Photoshop will now only change pixels that are lighter than this. Hold down the Alt (Windows) or Option (Mac) key and click to set the reference point. The cursor will change to an eye-dropper.
eyedropper
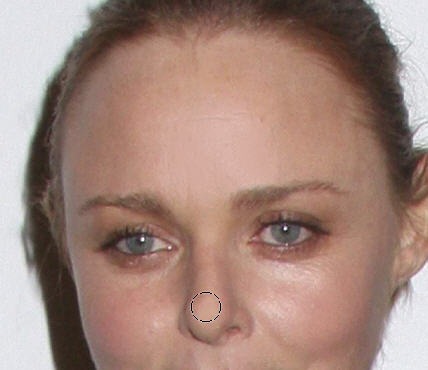
4. Start to paint over the hot spots with the Clone Stamp tool. The hot spots will fade but it will still look like natural skin. You’ll find that you need to resample several times in order to correctly match the skin tones. Just Alt/Option click every time you want to resample and start to paint again.
ForeheadAndNose
If the effect is too much, you can also reduce down the Opacity of the Clone Stamp Tool a little further to about 45 – 40%. Be especially careful on the skin under the eyes. You don’t want to replace hot spots with dark bags! Work around your image until you’ve removed all of the hot spots. Below you can see Before, on the left, and After.
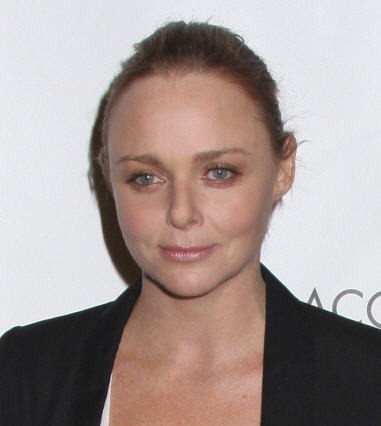
Before After
So with a couple of seconds of retouching with the Clone Stamp Tool and the right blending mode you can quickly and easily do a makeover and remove the sweaty, shiny look.

Create a Chaotic Disintegration Effect on a Face

01:26 Add Comment


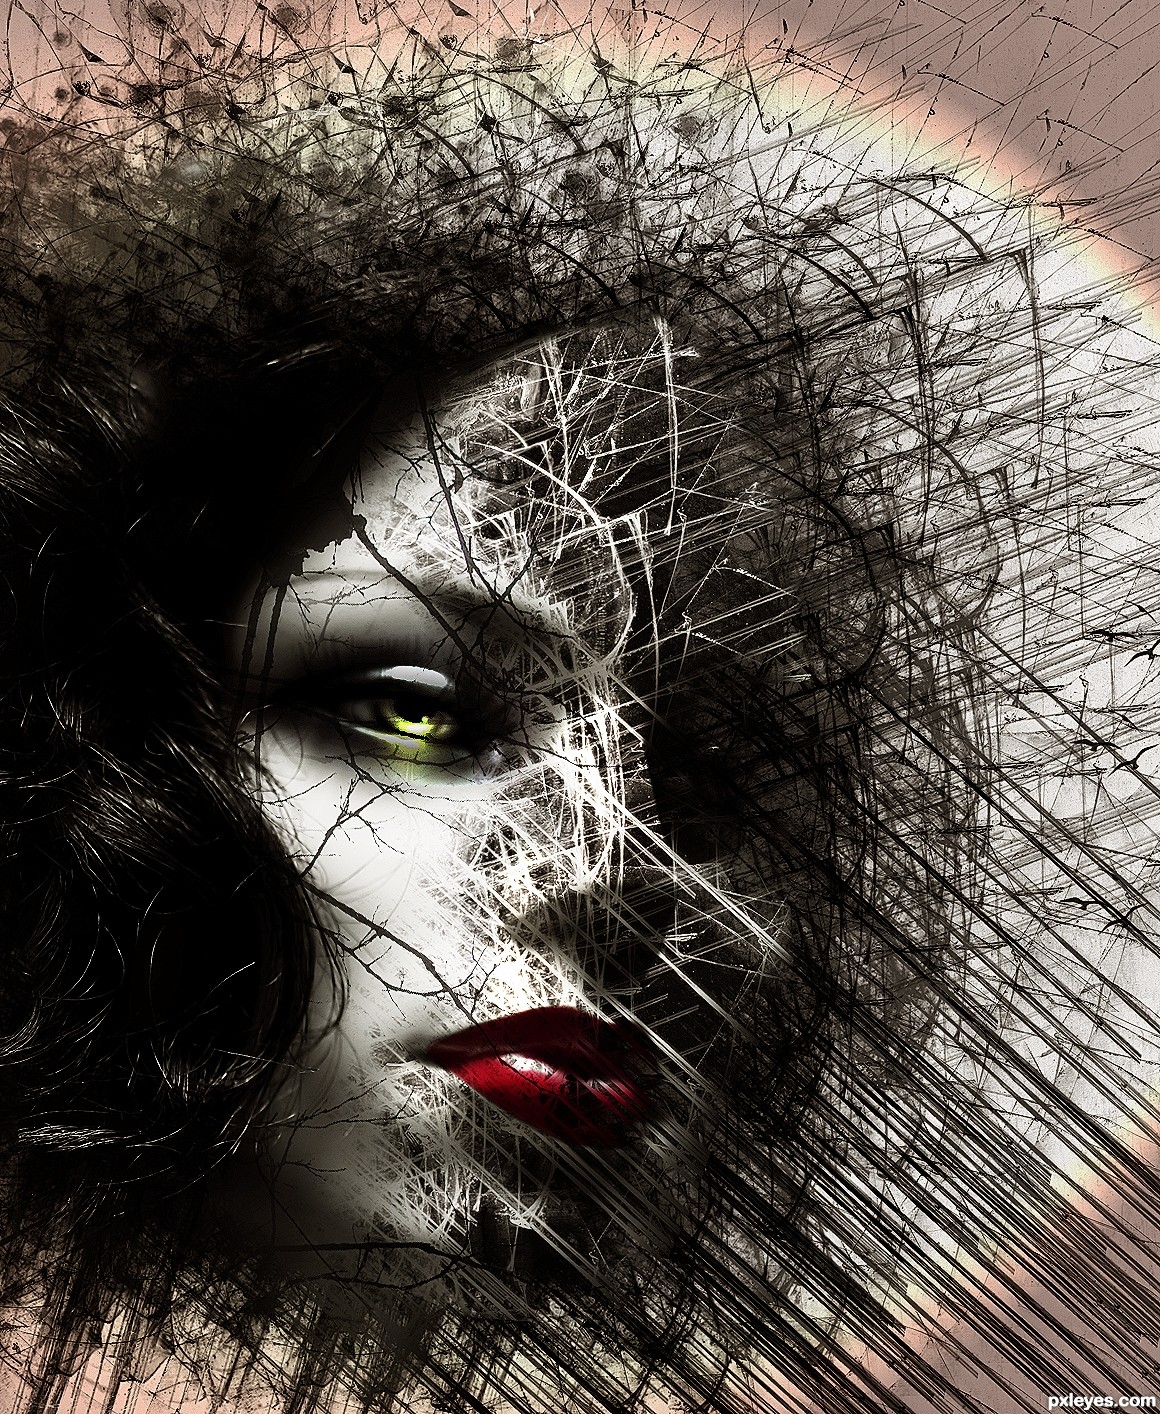
This tutorial will show you a quick and easy way in creating a stunning disintegration effect in photoshop.
I created this work on Photoshop CS5 but earlier versions will work as well.

The sources:
1. The face
2. Shatter glass brushes
3. Bird brushes
4. The branch 

You can see the hi-res of this work here

Let's just get started!


Step 1

First of all, go to file and then hit new to create a new canvas (Ctrl+N) . This new canvas will be the background layer in the layers palette


Step 2

Now duplicate the background layer (Ctrl+J). With the duplication layer (background copy) selected, go to Filter > Render > Lightning effect. See the picture for the details of lightning effect setting.


Step 3

Next , set the blending of the background copy layer to normal at 58% opacity after that duplicate it (Ctrl+J). Now we have background copy 2 layer. Set the blending of the background copy 2 layer to color dodge at 100% opacity.


Step 4

Continue to create a new layer (Shift+Ctrl+N) and name the new layer shape 1. Then, go to Brush tool (B) in tools palette. Choose shatter glass brush and paint a shape like mine. ( See the picture below ).


Step 5

Arrange the position of the shape 1 as shown in picture below:


Step 6

Next step is to duplicate the shape 1 layer three times and then place the three duplicated layers below it in the layers palette. Rearrange the position of each where needed. Set the shape1 copy layer to normal blending at 100% opacity, while the shape 1 copy 2 and the shape 1 copy 3 layer are set to multiply blending at 78% opacity. See the image below..


Step 7

Now open the face image. We will cut out the face. To achieve this, select Pen tool (P) in tool palette. Continue to trace the face by clicking new anchor points as you go, these show as small squares on your screen. Proceed with tracing the face and work your way to meet the first anchor and close the path. After that,right click on the closed path. When the pop up window for the path execution comes up, choose make selection. Finally inverse the selection (Shift+Ctrl+I) and hit Del to clear the background.


Step 8

Add the face to the canvas. It will be a new layer and name it Face in layers palette.


Step 9

Now it’s time to crate the disintegration effect to the face. We will use Clipping Mask to achieve this. To create a Clipping Mask, first make sure the shape 1 layer is directly under the face layer that we want to be clipped in the Layers palette . Hold down Alt and click the line between the two layers in the Layers palette. The cursor changes to a symbol. Click the mouse. You will see a small arrow pointing downward next to the face layer. This small arrow is the indication of a layer clipped mask.


Step 10

In this step we will add Gradient map. Go to Layer > new adjustment layer > gradient map.


Step 11

Now set the blending of the gradient map layer to overlay at 90 % opacity.


Step 12

I wanted to give some light to the eye of the face. To create the light, create a new layer (Shift+Ctrl+N) and name the new layer Light. Now select rectangular marquee tool to make a selection around the eye. Fill the selection (Shift+F5) with black color. Then, go to Filter > render > lens flare. Finally set the blending of the light layer to color dodge at 100% opacity. Remember to mask some area round the face to hide unnecessary light. Try to make the light just focus on the eye.


Step 13

To give more dramatic effect, I added the branch image. I duplicated it into some layers and arranged the duplicated layers in the positions where needed.Remember to re-size them and set the blending to multiply at around 50-100% opacity.


Step 14

In this last step, I added photo filter (Layer > new adjustment layer > Photo filter). Set the photo filter layer to normal at 30% opacity.


Step 15

Here is the result. Thank you for visiting this tutorial. Happy photoshoping...


Abstract Photo Manipulation in Photoshop CS 6

00:03 Add Comment


The new promotional images for Photoshop CS6 are really amazing, they were created by Alberto Seveso, an incredible digital artist from Italy. Seveso has been pushing the limits of creativity and the use of Photoshop for a long time and we are great admirer of his work. Intrigued with artworks we decided to create something inspired by his work.


It's amazing to see that such amazing images are most of the times done by simple techniques. This tutorial will show you how to achieve similar effect using Photoshop with Masks and Layer Effects. It's an intermediate tutorial but I am sure you will have so much fun doing as we did.

STEP 1

Open Photoshop and create a new document. I am using 2880x1800 pixels for mine After that let's use a photo of a beautiful girl. The one I am using is from YuriyZhuravov and it's title Beautiful smiling woman portrait on white background. Courtesy of Shutterstock.
Abstract Photo Manipulation in Photoshop CS 6

STEP 2

Now let's create some brushes to use for our masking exercise. The images I am using to create the brushes are also courtesy of Shutterstock and this first one is called "inks in water, colorful abstraction" by ADA_photo.
Abstract Photo Manipulation in Photoshop CS 6

STEP 3

Copy some parts of the previous image and paste in a new document. After that go to Edit>Define Brush. Add a name to your new brush and create a few more.
Abstract Photo Manipulation in Photoshop CS 6

STEP 4

Here's the second one, simply do the same thing as the previous step.
Abstract Photo Manipulation in Photoshop CS 6

STEP 5

Now using a different image, this one from NatUlrich called Ink in water. Isolated on white background. Again copy a few parts to create different brushes. I created 4 brushes for my image.
Abstract Photo Manipulation in Photoshop CS 6

STEP 6

Select the image layer and group it so the image will be in a folder. Duplicate this folder a few times because we will need it as we move forward. Hide all new folders and keep only one visible. Select the visible folder and go to Layer>Layer Mask>Hide All. The image will be completely hidden. After that select the Brush Tool (B) and one of the brushes you created from the stock photos. Using white for the color, paint on top of the layer mask to make part of the girl visible.
Abstract Photo Manipulation in Photoshop CS 6

STEP 7

Let's add some layer styles. I am using Inner Shadow, Inner Glow and Drop Shadow to create some depth for the different layers. You can see the values below.
Abstract Photo Manipulation in Photoshop CS 6

STEP 8

Select one of the hidden folders and make it visible. Apply the same process as we did in the previous steps to add another layer of our abstract collage.
Abstract Photo Manipulation in Photoshop CS 6

STEP 9

Add a new layer inside the folder and group this new layer as well. Change the Blend Mode to Color Burn. Select the layer again and change the opacity to 30%. Using the Brush Tool (B) with black for the color and a very soft brush, start painting a sort of shadow on the overlaping areas. The idea here is to add more depth and separate the parts a little bit more.
Abstract Photo Manipulation in Photoshop CS 6

STEP 10

Add more parts by repeating the same process. Every new part you should use a new folder with the image and the color burn folder.
Abstract Photo Manipulation in Photoshop CS 6

STEP 11

Use different brushes and different sizes to make the image more dynamic.
Abstract Photo Manipulation in Photoshop CS 6

STEP 12

Here is the final version of my layers. Notice that there's always a shadow between layers and the bottom one is different than the others. Try to vary as much as you can to make the effect more real.
Abstract Photo Manipulation in Photoshop CS 6

STEP 13

Select all layers and duplicate them. After that merge all new layers into one. Go to Filter>Blur>Iris Blur. The Iris Blur is pretty cool because we have a real time preview. So move the blur around until you get something like the image below. The goal is to blur the edges a little bit.
Abstract Photo Manipulation in Photoshop CS 6

CONCLUSION

Duplicate the layer and apply change the Blend Mode to Soft Light at 70% Opacity. Also duplicate it again and apply a Gaussian Blur with 10 pixels Radius. Change the Blend Mode to Screen at 40% Opacity. In the end you can apply a Photo Filter as well to make the colors match a little bit more.
Now you can try with different images, brushes and colors. Remember, the tutorials are more to illustrate the process, try to come up with your own images.
Abstract Photo Manipulation in Photoshop CS 6

Cartoon Yourself The Easy Way Using Photoshop

23:16 Add Comment
          

 This is my first post in PSFolder, a dedicated blog for PStuts and resources. Keep visiting, we post advanced Photoshop tutorials with step by step instructions which even a beginner can try it out with ease.

          In this Photoshop tutorial, we will turn a photo into a cartoon. You can use this technique to create an avatar for yourself, to see what you’d look like as a cartoon or to have fun turning your friends and family into cartoons.

Some tips to achieve success with your own photos: 
  1. Choose a photo that is similar in size to this one in the tutorial or you’ll have to adjust some of the filter settings. 
  2. Use a photo which has more details in face 
  3. Use a photo with a light background that is not too busy and finally, use a photo where you don’t see dark contrasty shadows on the face.

The image below is what we will be creating. OK let’s start!

Cartoon Yourself Photoshop

Step 1

Below is the sample image we will use for this tutorial.
base image

Step 2

Now to add a black line around his face and facial features, we will add a POSTER EDGES effect to the image. (Filter > Artistic > Poster Edges)
Enter the settings you see below. Note that if your photo is different in size, you may have to play with the settings a little to get a similar result.

2

This is how it looks now:
3

Step 3

Now add a TORN EDGES effect to our image. (Filter > Sketch > Torn Edges) BUT before you do, make sure on the Tool palette that the color Black is above the color White as this filter will use those colors.

4

Now enter those settings for Torn Edges. Note that here again, depending on the size of your image, you may have to play with the settings to get a satisfactory result.

6

This is how it should look like now.
5

Step 4

Now use a small White Paint Brush, with a Hardness of 100% and start cleaning up his face. Paint over any black dots or lines that are not attached to anything. You can also smooth out some lines if you want.
This is how it looks like now.
7

Step 5

Optional method : Now let’s use the Topaz plugin Clean to smooth out the lines. If you don’t have it already, you can download it HERE and use it completely free for 30 days.
Once the plugins are installed, go to Filter > Topaz Labs > Topaz Clean and then on the left side, choose the preset ‘Cartooned’.

Since the above plugin is too large in size, i prefer to use some pre-installed filters. Go to  Filters options and play with the effects available.

This is how it looks now with the smoother lines.
Topaz Clean

Step 6

Now what we need to do to be able to paint underneath the black lines is first, Select the entire image, Copy and then click on the CHANNELS tab.
  • On the Channel tab, at the bottom of the channel panel, click on the small icon represented by a page being lifted, this one is called ‘Create a New Channel’.
  • Once the ALPHA channel is created, click on it and PASTE our image on it.
  • Now we will need to INVERT our image so the contour is white and everything else is black. (Image > Adjustments > Invert)
  • Once that done, CTRL+CLICK (Cmd+CLICK) on the Alpha channel to create a selection around anything that is white.
  • That done, click back on the LAYERS tab, Create a New Layer and Fill the selection with the color Black.
  • Then right below, create a New Layer and fill it with the color White. (deselect first)
  • What we did here is to separate the black and the white so we will be able to paint below the black lines.
This is how it looks when working with channels.

9

And this is how it looks on the Layer palette.
10

Step 7

At this point, we can do some cleaning up again by adding a Layer Mask (click small icon illustrated by square with circle inside at the bottom of the layer palette) to the “Black” layer and erase with a small White Paint Brush, Hardness 100%, anything that you don’t like, I for example, smoothed out the thick black line defining the left cheek. Note that you can simply use the Eraser if you want here, the benefit of using a Layer Mask is to work in a non-destructive way so we can modify things later without issues.

This is how it looks now.

12

Step 8

Now let’s add some colors.
  • Under the “Black” layer, create 3 Layers on which we will be applying the colors.
  • First layer, you can use this color #e7c5b3 to color the skin.
  • Second layer, color the shirt.
  • Third layer, use white to color the eyes.
This is how it looks now.
13

Step 9

Now let’s add some shadows and highlights to the boy’s face.
Create a New Layer on top of the layer stack and call it ‘Shadows’ and then another right above and call it ‘Highlights’.
Let’s first add shadows and to see what we are doing, reduce the ‘Shadows’ Layer Opacity to 50%. Then use a Black Paint Brush with a Hardness of 100% and a size of maybe 90px and start to trace a shadow on his left side like you see below and on the ‘Highlights’ layer, do the same thing with White Paint Brush. Then use a smaller brush and trace some highlights and shadows on both side of his nose. Use the Eraser to fine tune the highlights/shadows around his nose.

This is how it looks.
14

Step 10

  • Now change the Layer Blending Mode of the ‘Shadows’ layer to SOFT LIGHT and lower the layer Opacity to 30%.
  • Change also the Layer Blending Mode of the ‘Highlights’ layer to OVERLAY and lower the layer Opacity to 20%.
  • Now we don’t see any black or white paint going over the edge of the face but that’s because the background is white. Since we want to add color to the background, we will have to erase anything that spill outside of the face.
  • To do so, select the “Black” layer (the black contour of the face) along with the 3 “color” layers, DUPLICATE them and then MERGE the duplicated layers.
  • Now on that layer, use the MAGIC WAND TOOL with a Tolerance of about 25 and click the background. Then go to Selection > Modify > Expand and expand the selection 1px.
  • Now hide that layer since we don’t need it anymore and go on the ‘Shadows’ Layer. Now INVERSE the selection and create a Layer Mask. Automatically, you will see on the Layer mask that inside the selection, the boy, is white and the background is black. Black on a layer mask hides whatever is there, which is what we want.
  • Now do the same exact thing for the ‘Highlights’ layer.
This is how it looks now.

15

Step 11

Now let’s do the background. Add a New Layer under everything and call it ‘Background’.
Choose the GRADIENT TOOL then on top horizontal menu, choose Linear Gradient and enter those 2 colors, #5d849a and #9cb5c3. The click somewhere on the lower left side, drag it up and release the mouse button somewhere in the upper right side of the image.
Now right above the background, we can create a New Layer and add a White outline all around the boy like you see blow. It is simple to do, just CTRL+CLICK the Layer Mask of the “Shadows” Layer, the one where the boy is white and the background is black, then go to Select > Modify > Expand and enter 4px. Make sure you are on the New Layer you just created and fill the selection with white. Then you can lower the layer Opacity to 50%.
Then you can add some black borders, a texture to the background and some text. If you do all of this, it will probably look like this.


Cartoon Yourself Photoshop

Avatar size:

Avatar Photoshop

I hope you have enjoyed this tutorial, share if you did ;)